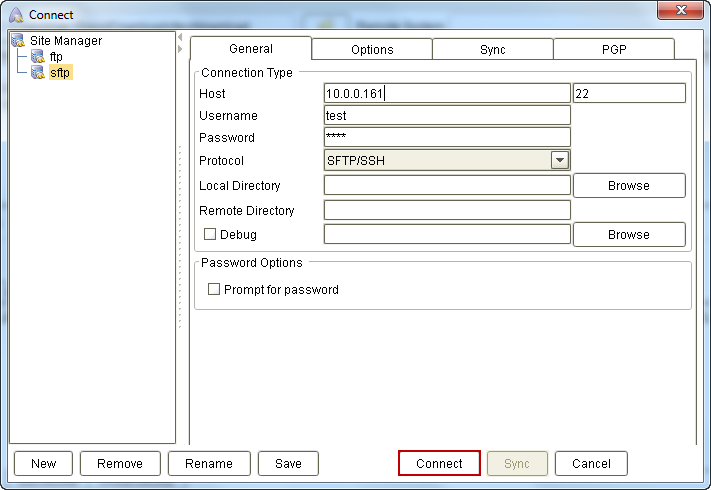
To connect via SFTP/SSH, navigate to the General panel, expand the drop-down list beside Connection Type, and select SFTP/SSH.
Figure 7

Note that the settings displayed on the dialog box will vary depending on which connection type you choose. So it is important that you select the Connection Type first before entering any setting values.
Basic SFTP/SSH settings
Normally, you would only need to specify these three settings for a simple SFTP/SSH configuration:
Host – This is the address of your sftp/ssh server. (e.g. secure.mftexpress.com). The small box you see beside the Host box is where you're supposed to enter the port number. In most cases, you can just leave it to the default: 22.
Username – The username required for logging into the sftp/ssh site.
Password – The corresponding password for that username.
Once you've assigned the appropriate values to those settings, click the Connect button.
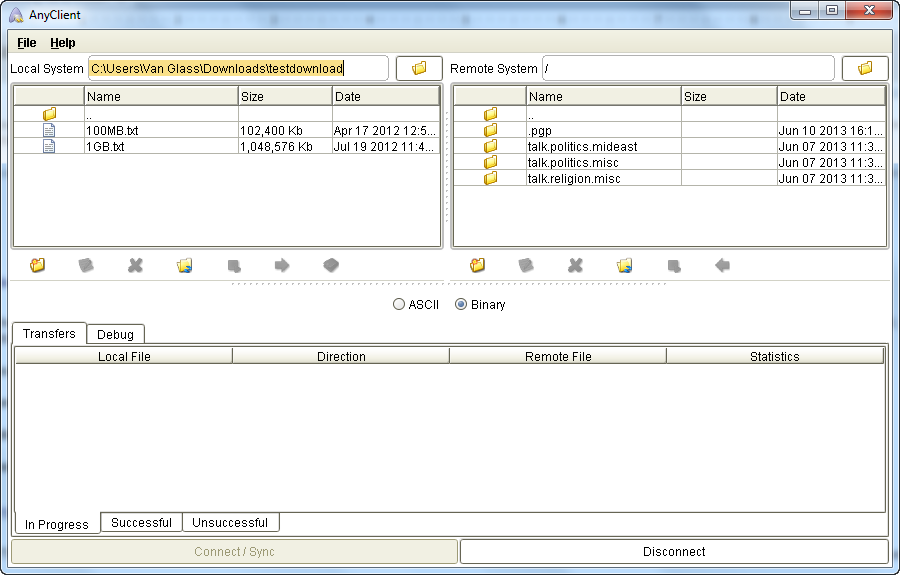
Figure 8
Assuming everything goes smoothly, the Connect dialog box will close and you'll be brought back to the home screen. You'll then be able to monitor the entire connection process through the panel found at the bottom of the home screen.
As soon as the connection completes, the right panel under the Remote System side of the home screen will activate and display the files and folders on the server.
Figure 9
Advanced SFTP/SSH settings
Other servers may require you to specify more settings. Your service provider can provide you with this information. Depending on how the server is configured, you may need to specify some or all of the following settings in addition to the basic SFTP/SSH settings taken up earlier.
Local Directory - The local directory to change to upon establishing a connection.
Remote Directory - The remote directory to change to upon establishing a connection.
Debug - If checked, debug mode is enabled and debug messages will be written to Debug pane and/or specified debug file.
Prompt for password - If checked password will not be saved in site profile and user will be prompted for password when connecting.
SFTP/SSH Authentication
SFTP authenticates clients by requiring either a username and password (a.k.a. Password authentication) or a public/private key pair (a.k.a. Public key authentication).
Use password authentication check box – Check this check box if you want to connect to the server using password authentication. Password authentication is the easier type of authentication and is the one being referred to in the previous subsection, Basic SFTP/SSH settings.
Public key authentication check box – Check this check box if you want to connect to the server using public key authentication. In this type of authentication, we will assume that: you have already generated the necessary public/private key pair, that the server already has a copy of your public key, and that you already have the private key stored in your local hard drive. To connect to the SFTP/SSH server using AnyClient, you would need your:
| • | Private Key File – This is the file that contains your Private Key, which you can point to by clicking the Browse button and selecting to the appropriate file. |
| • | Key Password – This is the password you used to protect your Private Key File with. |
Use subsystem reply needed check box – This option may be necessary for authenticating with some SFTP servers.
Proxy Settings
If you're having trouble connecting to an sftp/ssh server from your office LAN, it's possible that a proxy server is in the way. Contact your network administrator and, after confirming that a proxy indeed exists, ask for the required proxy settings. These are the information you'll need:
Proxy Host – The address and port number for your proxy server. Enter the address into the bigger box and the port number into the smaller box.
Proxy Type – The default is NONE, whereby you don't need to specify any proxy settings. The other two options are SOCKS5 and HTTP. Choose one from the drop-down list.
Proxy User – This is the username required to connect to the proxy server.
Password – This is the corresponding password for that username.
Synchronization Settings
Enable - If checked directory synchronization is enabled.
Local Directory - The local directory to synchronize from/to.
Remote Directory - The remote directory to synchronize from/to.
Sync Direction - The direction of synchronization. "upload" indicates synchronization from Local Directory to Remote Directory, whereas "download" indicates synchronization from Remote Directory to Local Directory.
Sync Mode - The method used for determining whether a file should be synchronized. Valid options are timestamp and filesize.
Sync Recursively - If checked the directory and all sub-directories will be synced recursively.
Delete Orphaned Files - If checked files that exist on destination but do not exist in source will be automatically deleted.
Includes - Regular expression indicating what files to include during synchronization.
Excludes - Regular expression indicating what files to exclude during synchronization.
PGP Decryption Settings
Enabled - If checked PGP encrypted files matching regular expression will be automatically decrypted after download.
Filename regex - The regular expression to use to determine whether files are PGP encrypted.
Private key - The private key to use for decrypting PGP encrypted files.
Password - The password protecting the private key.
Public key - The public key to use for verifying the signature on a PGP encrypted file.
Delete source - If checked PGP encrypted files will be deleted after successful decryption.