Health check settings must be configured before you can create a health check. If you attempt to add a health check and the settings have not been configured, the "Health Check Settings" window (Figure 35) will pop up, after the license agreement has been accepted. If the license agreement has not been accepted, the "Health Check EULA" window will pop up first, followed by the Health Check Settings window.
You can optionally configure the settings before adding a health check. See the "Edit Health Check Settings" information below.
Figure 35
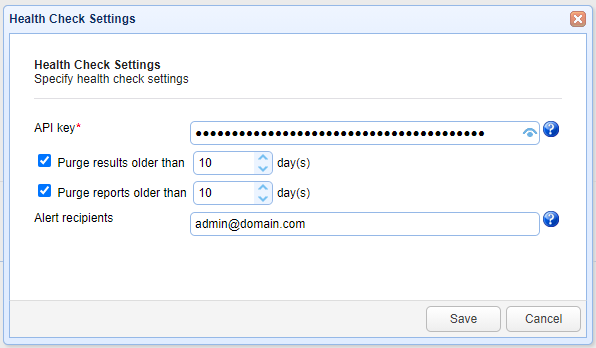
API Key - Enter the API Key provided to you by Advanced Systems Concepts, Inc. This field is required.
The API key is used when communicating with the AWS cloud service, which is where health check data is processed and the report is generated.
Purge results older than <X> days - When checked, locally stored health check results older than the value entered will be deleted automatically by the system.
If not checked, you still have the option to purge and/or delete results manually. These options are located in the Health Service Results tab.
As a best practice, please configure the setting to purge the results so the data does not accumulate excessively.
Purge reports older than <X> days - When checked, locally stored health check reports older than the value entered will be deleted automatically by the system.
If not checked, you still have the option to purge and/or delete reports manually. These options are located in the Health Service Reports tab.
As a best practice, please configure the setting to purge the reports so they do not accumulate excessively.
Alert recipients - One or more comma-separated email addresses for individuals who wish to be notified that a new health report is ready for viewing.
Save - The health check settings are saved.
Note: The"Health Check Product" window will appear after clicking Save if the Health Check Settings were configured as a result of clicking on the Health Checks Add button.
From this point on, you are now adding a health check, which is described in the "Creating a health check" section.
Cancel - The settings will not be saved.
Note: As a reminder, you must configure the settings before you can add a health check. Therefore, if the settings window popped up when you were attempting to add a health check,
clicking the Health Check Settings cancel button will also cancel adding the health check.
Edit Health Check Settings:
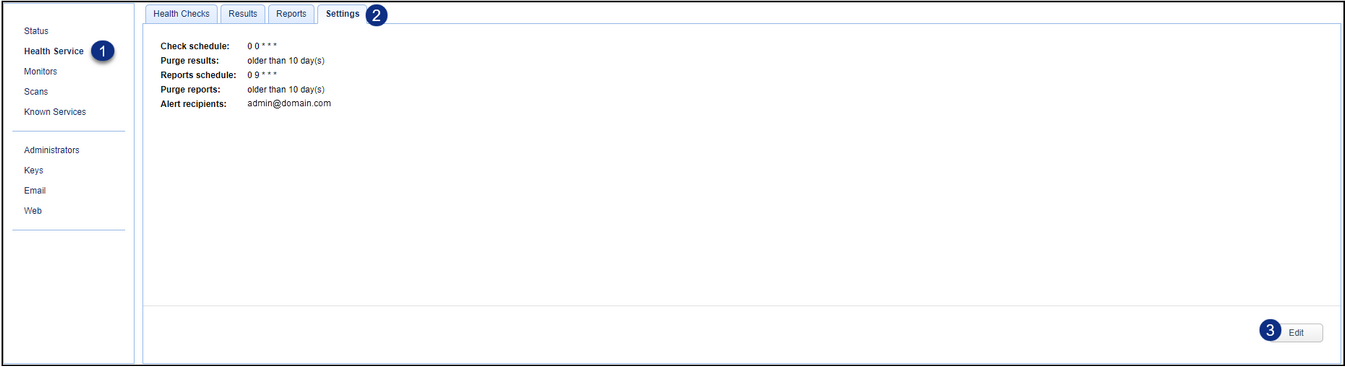
To edit health check settings, navigate to the Health Service module in the web interface, then click the Settings tab. There you will see a list of settings, as depicted in Figure 40.
You can modify any of the above described settings by clicking on the Edit button. The Health Check Settings window will appear, providing the license agreement has been accepted. The settings window is the same as depicted in Figure 35.
Two settings that cannot be modified, but are visible in the settings tab, include "Check schedule" and "Reports schedule" (Figure 40). Check schedule is the date and time the system scheduled health check runs, which is daily at 12:00 am.
Reports Schedule is the date and time the system checks to see if there are any new health reports in the AWS cloud to retrieve, which is where the reports are generated. This occurs daily at 9:00 am.
Figure 40