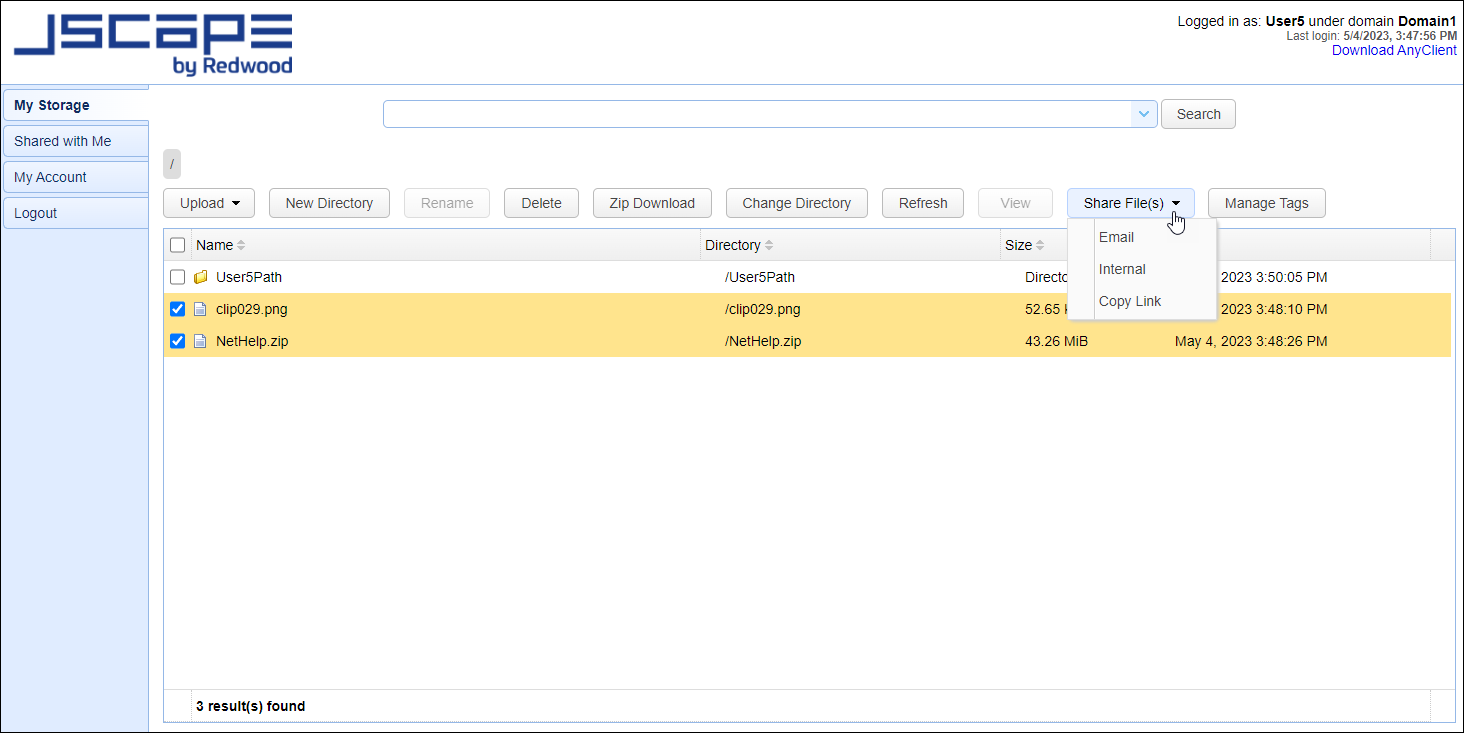
Using MFT Server Web Client you can Share File(s) ad-hoc if you have been granted rights to do so by an MFT Server Administrator. See Adding Users, which describes the "Enable ad-hoc transfers" setting that must be configured for Share File access. You will not see the Share File(s) button in the image depicted in Figure 399 unless you have been granted permission to at least one share file method (email, internal, copy link). In addition, it is possible that "Enable ad-hoc transfers" has been enabled for a user, but the ability to share files has been restricted at the virtual path level (this is also described in the above mentioned "Adding Users" section). If there is a restriction set at the virtual path level, the Share File(s) button may not be present, or if it is present, it will be disabled for the virtual path that has been restricted.
Please note that sharing files via email has additional configuration requirements that must be set by an MFT Server Administrator. See Enabling Emailing Transfers.
The Share File(s) methods include email, internal and copy link. See Figure 399.
In general, the email option will email the recipient(s) links to the shared file(s) in the email's body. A password may be required if password protection is enabled.
Next, the internal option makes shared files accessible to internal MFT Server domain users via the Shared with Me module in the MFT Server Web Client. Therefore, to access the shared files using the internal method, the user who receives an email notification that the files have been shared with them will authenticate by logging in to the MFT Server Web Client. Note: Sending the email notification to alert the internal user that files have been shared with them is optional. See more details under the "Internal" discussion below.
Lastly, the copy link option will create an anonymous link that will allow access to the files using HTTP/S. The copy link option does not require authentication. An example copy link use case would be to provide a link on a website that allows users to download one or more files from MFT Server over HTTP/S.
Any filles/directories that are successfully shared by the logged in client user will appear in their My Account > Ad-Hoc Activity list. Ad-hoc activity is also recorded in the MFT Server Manager application; see the applicable Domain's SHARING > Ad-Hoc Activity module.
Figure 399
Email - To email files via the MFT Server Web Client, select one or more files and/or directories from the My Storage list, then select the Share Files button drop-down arrow and select Email. The Share File(s) -> Email window will appear. Reminder: The files selected will be accessible via a link in the email's body. They are not sent as attachments.
Figure 92
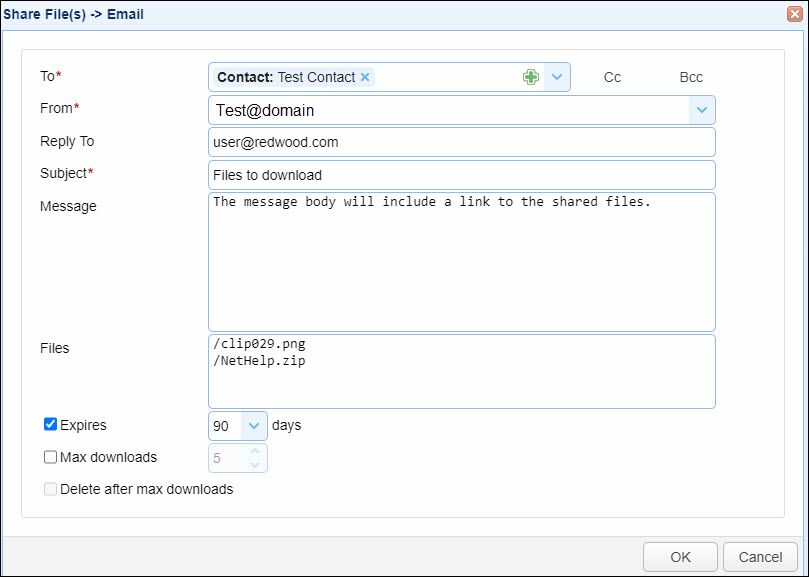
To - The email address to send the email message to. Described below are the 3 methods available to populate this field. The methods are not mutually exclusive
| 1. | Manually type one or more email addresses, comma separated. |
| 2. | Click on the green plus (+) icon to add a contact. When the Add Contact dialog pops up, enter the required fields (Name and Email), then click OK. The contact name will appear in the To field, with the word Contact preceding the name (see the image above). You can add multiple contacts, if desired. Contacts added here will be added to the Domain's SHARING > Contacts module. |
| 3. | Click on the down arrow, and select an existing contact or group (if there are any). The user logged in to the Web Client will only see groups that they are a member of, and the group must also have the Allow use in ad-hoc file transfers checkbox checked (to be displayed in the list). Contacts in the list are either public or owned by the user logged in to the Web client UI. When a group or contact is selected from the list, the appropriate label will precede the group or contact name (e.g. Group:Administrators, Contact:John Doe). |
Cc - Adds Cc (carbon-copy) email addresses. You can add the email address using methods 1 and 3 described above.
Bcc - Adds Bcc (blind-carbon-copy) email addresses. You can add the email address using methods 1 and 3 described above
Note: If an ad-hoc file transfer cannot be sent to one or more of the recipients of a Group, an appropriate error message will be displayed. This will not prevent the ad-hoc transfer from being sent to other recipients in the Group.
From - The email address used to send the email message. The From address configured in the MFT Server Manager UI, under Settings MISCELLANEOUS > Email > Email > From will be used by default. Additionally, if any Allowed Senders have been configured in the MFT Server Manager UI, under Settings MISCELLANEOUS > Email > Ad-Hoc File Transfer > Allowed Senders,you can select one from the From dropdown list. If selected, it will be the email account used to send the email message.
Reply-To - Sets Reply-To header for email message, providing a Reply-To address that may be different than the default From email address.
Subject - The subject of the message.
Message - Custom message to send to recipient.
Files - The files to send. If there are multiple files, the email message will also include a link to a zip file so the recipient does not need to download each individual file.
Password protect with - If password protection is enabled then user may have the option to specify a password. Options available include:
| • | User-defined password sent out-of-band - Sender specifies a password that is communicated to recipient out-of-band (e.g. over the phone or other method). |
| • | Random password sent via email - A random password is generated by the server and included in email message sent to recipient. |
Expires - The number of days for which these files may be accessed by the recipient.
Max downloads - The maximum number of times recipient may download files.
Delete after max downloads - Automatically deletes file after maximum number of downloads is reached.
Internal - To share files with internal MFT Server domain user(s) via the MFT Server Web Client, select one or more files and/or directories from the My Storage list, then select the Share Files button drop-down arrow and select Internal. The Share File(s) -> Internal window will appear. The users that you share the files with will download them by accessing the link provided in the message of an email notification. The link will pull up the MFT Server Web Client login window. After logging in, the user will automatically be directed to the Shared with Me module, and the download of the files will begin.
Figure 400
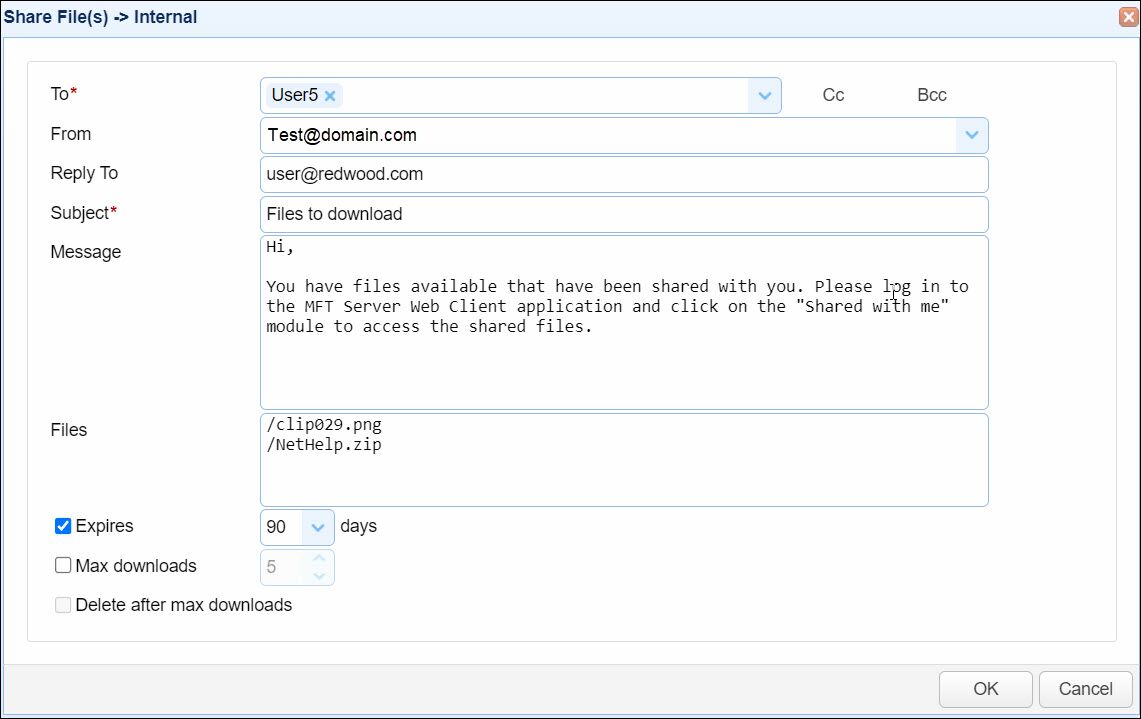
To - The MFT Server Domain user(s) to share the files with. When clicking on the drop-down arrow of this field, you will see a list of MFT Server domain user login names. Select the desired user(s). Only users in this list are allowed. A notification email that the shared files are available via the MFT Server Client application will be sent to the email address configured for the user in the Domain > ACCOUNTS > Users module.
Cc - Adds Cc (carbon-copy) email address(s) - comma separated if multiple addresses are used. This will send a notification email to the recipients, indicating that shared files have been made accessible to the MFT Server domain user(s) configured in the "To" field.
Bcc - Adds Bcc (blind-carbon-copy) email address(s) - comma separated if multiple addresses are used. This will send a notification email to the recipients, indicating that shared files have been made accessible to the MFT Server domain user(s) configured in the "To" field.
From - The email address to send the email from. The From address configured in the MFT Server Manager UI, under Settings MISCELLANEOUS > Email > Email > From will be used by default. Additionally, if any Allowed Senders have been configured in the MFT Server Manager UI, under Settings MISCELLANEOUS > Email > Ad-Hoc File Transfer > Allowed Senders, you can select one from the From dropdown list. If selected, it will be the email account used to send the email message that file(s) have been shared internally.
Note: The From field can be left blank, if you do not need (or want) an email to go out notifying the recipient that a file is available for download. When the From field is left blank, the file(s) will still be made available to the To recipient (i.e., the internal user), but they will not be notified via email when files have been shared. When the recipient logs in to the MFT Server Web Client and navigates to the Shared with Me module,they will see files that have been shared internally with them, including the date/time they were shared. The recipient can right click on any record in the grid and select Download, View or Refresh from the pop-up menu. Double-clicking on a record will also start a download. A use case for leaving the From field blank is some MFT Server users do not configure email, but still want to share files internally. The drawback is the recipient will not be notified via email that file(s) have been shared, so they will need to check the Shared with Me module periodically to see if any new files have been shared.
Reply-To - Sets Reply-To header for email message. This will default to the email address of the user sharing the files.
Subject - The subject of the email notification message.
Message - Custom message to send to recipient.
Files - The files to share with the domain user recipient(s). If you selected a single file from My Storage, then the link in the notification email will be for the single file. If you select more than one file and/or directory, then link will include a zip file
Expires - The number of days for which these files may be accessed by the recipient.
Max downloads - The maximum number of times recipient may download files.
Delete after max downloads - Automatically deletes file after maximum number of downloads is reached.
Copy Link - To make files accessible via an anonymous HTTP/S link using the MFT Server Web Client, select one or more files and/or directories from the My Storage list, then select the Share Files button drop-down arrow and select Copy Link. The Share File(s) -> Copy Link window will appear.
Figure 401
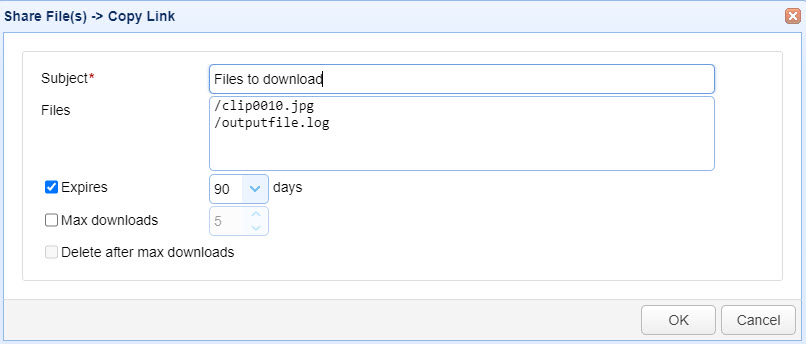
Subject - The subject of the message.
Files - The files to create a link for. If you selected a single file from My Storage, then an ad-hoc link that points to this file is copied to the clipboard. If you select more than one file and/or directory, then an ad-hoc link that points to a ZIP archive of selected file(s)/directorie(s) is copied to the clipboard.
Expires - The number of days for which these files may be accessed.
Max downloads - The maximum number of times the files may be downloaded.
Delete after max downloads - Automatically deletes file after maximum number of downloads is reached.