To benefit fully from the use of triggers you may find it helpful to understand the lifecycle of a trigger. This is explained below.
1. Raise event
The first step in trigger lifecycle starts with an event. There are a number of events that can be listened for in a trigger. Examples of these are provided below.
Current Time
This event is automatically raised every minute and can be used for scheduling triggers.
File Upload
This event is raised anytime a file is uploaded via one of the file transfer services provided by the server.
User Login
This event is raised anytime a user attempts to login to the server.
For a complete list of available events please see the Event type field when adding or editing a trigger, or click here: Event Types
2. Identify matching triggers
The next step in the trigger lifecycle is to identify those enabled triggers that are listening for the event type raised. For example, in the case where a File Upload event is fired all triggers listening for the File Upload event will be identified.
3. Filter trigger conditions
Next in the trigger lifecycle is to filter those matching triggers even further, excluding those that do not match trigger conditions that may have been specified. To explain, each event has a set of properties that are set when the event is raised. These properties can be accessed in trigger conditions and trigger actions using event variables. For example, a trigger may choose to listen only for File Upload events where the login of the user that uploaded the file matches a specific value.
Example Condition
Username = "test"
Note, each event has different event variables available to it. For example, the File Upload event has a LocalPath variable that may be used to identify the absolute path of the file uploaded. This variable however is not available in the User Login event.
To see what variables are available for each event type please use the Variables button when adding a condition or the Add Variable button when adding an action to a trigger.
See also
4. Prepare for execution
Now that triggers have been identified and filtered, the next step is to prepare for the execution of those triggers.
Each trigger may be executed in asynchronous (concurrently) or synchronous (sequentially) mode depending on the settings for the individual trigger. The default is synchronous. To change to asynchronous, access the trigger’s Advanced tab and check the Run trigger asynchronous checkbox. At this point in the lifecycle, these triggers are split into two separate queues, one for asynchronous triggers and another for synchronous triggers. Those triggers in the asynchronous queue are executed first, followed by those in the synchronous queue. Those triggers in the synchronous queue are executed in the order they are defined in the Triggers module of MFT Server. The order of execution for synchronous triggers can be controlled using the Order button with those triggers located at the top taking priority.
Note, depending on the optional settings in the AUTOMATION > Triggers > Settings tab of MFT Server you may limit the number of triggers that will execute concurrently. Those triggers that are waiting to be executed will have a status of pending in the AUTOMATION > Triggers > History tab of MFT Server.
Also note that any functions that are used in the trigger Conditions or the trigger Actions will be executed at this time, not when the actions are executed.
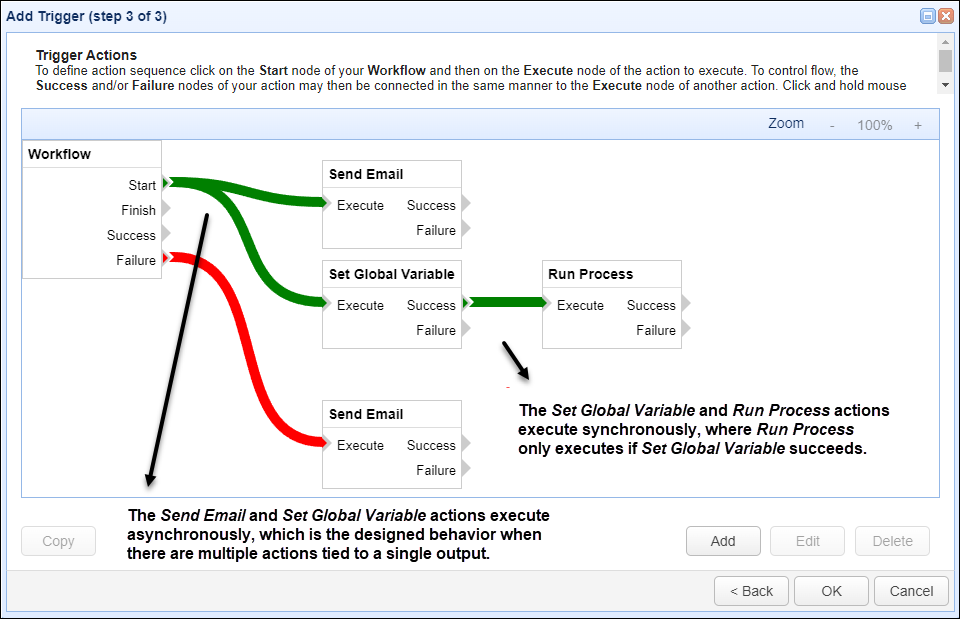
Every trigger has a single Workflow node and one or more action nodes. The Workflow node has four outputs, Start, Finish, Success and Failure. You can add one or more action nodes to each Workflow output. For example, you can have two actions linked to the Workflow’s Start output (as depicted in Figure 292), or you can have three actions linked to the Workflow’s Finish output, and so on. When there are multiple actions linked to any individual Workflow output, they are executed asynchronously (concurrently). Every action node also has outputs, which are typically Success or Failure, but some actions have different outputs. For example, the If action has Then and Else outputs. Regardless of the type of outputs supported by any given action, you can link one or more additional actions to a prior action’s outputs. Like the Workflow, multiple actions linked to an individual action's output (e.g. Success) are executed asynchronously. Action nodes are only executed if the output of the node it is linked to evaluates to true. For example, when an action runs successfully, its Success output evaluates to true, and any additional actions linked to the Success output are executed. Any actions linked to the Failure output are not executed, since the action did not fail.
As depicted in figure 292 below, the Workflow has two actions linked to the Start output, Send Email and Set Global Variable. These actions will run asynchronously when the Workflow starts. If the Set Global Variable action is a success, the Run Process action will execute. When additional actions are linked to a prior action’s output (as is the case with the Set Global Variable and Run Process link), they are run synchronously (sequentially), and they only run if the output they are linked to evaluates to true. As a reminder, if there were two or more actions linked to the Set Global Variable's Success output, they would only run if the Set Global Variable action succeeds, and if that is true, the two or more actions would run asynchronously.
Figure 292
In the event that an action fails, a Trigger Error event is raised. In addition, subsequent actions that run synchronously will not be executed. To listen for these errors a separate trigger that listens for the Trigger Error event may be used. Triggers that fail execution will have a status of failed in the AUTOMATION > Triggers > History tab of MFT Server.
Triggers that successfully execute will have a status of completed in the AUTOMATION > Triggers > History tab of MFT Server.
6. Log results
The full lifecycle of a trigger is written to the server log for historical and auditing purposes. You may also view the status of historical triggers in the AUTOMATION > Triggers > History tab of MFT Server.