This trading partner exchanges data with another MFT Server instance using the Client REST API.
For this to work, step through the following 3 items on the remote MFT Server instance.
1) Navigate to Settings > MISCELLANEOUS > Web > Web. Under the Web Server heading make sure Http on host, or HTTPS on host is checked, depending on which protocol you wish to use. Take note of the port for the protocol you are using. You will need it to configure this trading partner.
2) In the desired domain, navigate to the SERVICES > Listeners > Listeners module and add the HTTP/S protocol (if it hasn't been added already). Make sure the protocol you wish to use is checked (HTTP or HTTPS).
3) In the same domain as above, add a user account (if one does not already exist) that will be used when data is exchanged with the MFT REST trading partner. See ACCOUNTS > Users > Users. Take note of this user account (the username and password). You will need it to configure this trading partner.
Adding the MFT REST trading partner
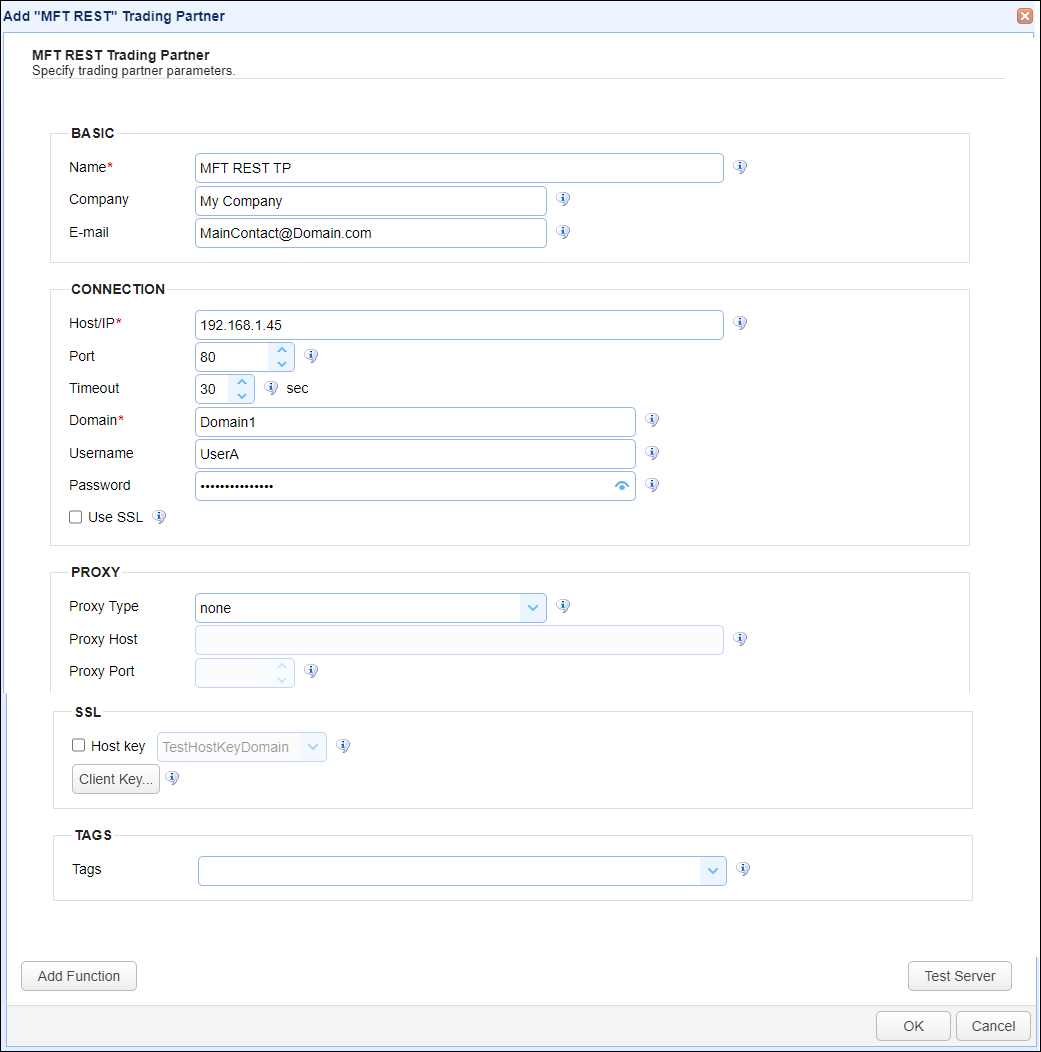
In the desired domain on the local MFT Server system, navigate to the AUTOMATION > Trading Partners module. Click on the Add button, or right click anywhere in the grid area and select Add from the pop-up menu. In the Add Trading Partner dialog window, select MFT REST as the Protocol, then click OK. The Add "MFT REST" Trading Partner dialog will appear as depicted in the figure below.
Figure 464

Basic
Name - The unique name to assign to this trading partner. Enter a name that best describes the trading partner, as you will be selecting the name when using the partner in MFT Server features that support it.
Company - The name of the company that this trading partner represents.
E-mail - The primary email address for this trading partner.
Connection
Host/IP - The hostname or IP address for the remote MFT Server.
.
Port - The port number for the remote HTTP or HTTPS service. The port number to use is the same port number configured for the Web Server port, as described in Item 1 at the top of the page.
Timeout - The maximum time (in seconds) for establishing a connection to the remote service.
Domain - This is the remote MFT Server domain name. The domain name to use is the same domain where you configured the HTTP/S service, as described in Item 2 at the top of the page.
Username - The username to use when logging in to the remote MFT Server client REST service, which is the user that will be used when exchanging data. The username to specify here is the same user described in Item 3 at the top of the page.
Password - The password to use for the account specified in Username.
Use SSL - If checked, enables SSL protection (HTTPS) for this trading partner connection. This means HTTPS must be configured as per items 1 and 2 at the top of the page.
Proxy
This section is for MFT Server customers who have configured a proxy server that the trading partner connection is required to go through.
Proxy Type - The type of proxy service. If selected, enter the fields below:
| • | Proxy Host - The hostname or IP address of the proxy service. |
| • | Proxy Port - The port number of the proxy service |
SSL
Host Key - If checked, this means a certificate is being used to verify the identity of the remote server. The field's dropdown list allows you to select a Host key - managed by the Key Manager. The Host key is the public certificate generated by the administrator of the remote service, then sent to the MFT Server administrator. The certificate can then be imported into the Host Keys grid - on the global-level (Keys > Host Keys) or domain-level (SECURITY > Keys > Host Keys).
Client Key - This key is used to enhance the authentication of the MFT Server (the client) connection to the remote MFT Client REST API. A key pair (where the public key is in the form of a certificate) is used for client authentication. Click the Client Key button, then select the client key type, which consists of the three options described below. Note: The remote REST service administrator and the MFT Server administrator are both capable of generating the key pair and providing the appropriate key to the respective party.
| • | Use one-time key - If selected, a one-time key is used for authentication. It is generated on-the-fly and discarded after the connection is closed. |
| • | Use server key - If selected, you will be provided with a dropdown list of Server Keys to choose from - managed by the Key Manager. Typically this option is selected when the MFT Server administrator provides the public key via a certificate to the remote MFT Client REST service administrator. Choosing this option saves time by allowing you to select an already existing certificate. The certificate for the selected Server Key can be exported and sent to the remote REST service administrator. |
| • | Use key file - If selected, this is a file-based key that must be accessible to the MFT Server. For example, C:\PrivateKeyFolder\TradingPartner.prv. Typically this option is selected when the key is already generated by some other application. |
| o | Key file password - If Use key file type is selected, this is the optional client key password to be used for the connection. |
Tags
Tags - If specified, this is the one or more tags that are used to limit which administrators have access to this trading partner.
Example using the MFT REST trading partner in a trigger action
Triggers are created on the domain-level in AUTOMATION > Triggers. Triggers listen for events (e.g., a file upload) and respond with actions. There are many trading partner-specific trigger actions. This example does not provide all the steps when creating a trigger; it describes how a trigger action would be configured using the MFT REST trading partner. For a complete discussion about triggers, click here.
Assume, when a trigger event occurs, you would like a file to be automatically uploaded from the MFT Server to the MFT REST trading partner.
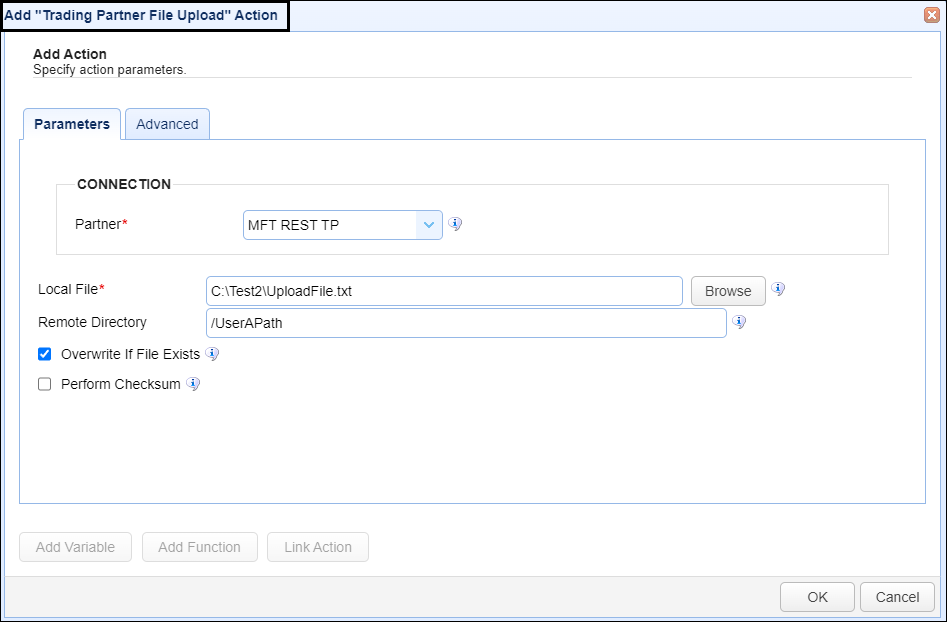
To accomplish this, you would need to add an action to the trigger, in the Trigger Actions area. The action to add is Trading Partner File Upload as depicted in figure 465 below.
Figure 465

Partner - This is the MFT REST trading partner name. A list of existing trading partners will appear in the dropdown list for you to choose from.
Local File - This is the local file on the MFT Server to upload to the MFT REST trading partner.
Remote Directory - This is the virtual path name that identifies where to upload the file to on the remote MFT REST system. This is an existing virtual path name configured either on the remote user specified in the Username field (described in the Connection section above), or configured on a group the remote user is a member of. See Defining Virtual Paths for more information. The Real path that the virtual path points to is the directory where the file will be uploaded.